[{"countryCode":"ar","countryName":"Argentina","managerCountryCode":"ar"},{"countryCode":"au","countryName":"Australia","managerCountryCode":"au"},{"countryCode":"at","countryName":"Austria","managerCountryCode":"at"},{"countryCode":"bh","countryName":"Bahrain","managerCountryCode":"ae"},{"countryCode":"by","countryName":"Belarus","managerCountryCode":"by"},{"countryCode":"be","countryName":"Belgium (Flanders)","managerCountryCode":"nl"},{"countryCode":"br","countryName":"Brazil","managerCountryCode":"br"},{"countryCode":"bg","countryName":"Bulgaria","managerCountryCode":"ro"},{"countryCode":"kh","countryName":"Cambodia","managerCountryCode":"th"},{"countryCode":"ca","countryName":"Canada","managerCountryCode":"ca"},{"countryCode":"cl","countryName":"Chile","managerCountryCode":"cl"},{"countryCode":"cn","countryName":"China","managerCountryCode":"cn"},{"countryCode":"co","countryName":"Colombia","managerCountryCode":"pe"},{"countryCode":"cr","countryName":"Costa Rica","managerCountryCode":"cr"},{"countryCode":"hr","countryName":"Croatia","managerCountryCode":"si"},{"countryCode":"cz","countryName":"Czech Republic","managerCountryCode":"cz"},{"countryCode":"dk","countryName":"Denmark","managerCountryCode":"dk"},{"countryCode":"ec","countryName":"Ecuador","managerCountryCode":"pe"},{"countryCode":"eg","countryName":"Egypt","managerCountryCode":"eg"},{"countryCode":"sv","countryName":"El Salvador","managerCountryCode":"sv"},{"countryCode":"ee","countryName":"Estonia","managerCountryCode":"lt"},{"countryCode":"fi","countryName":"Finland","managerCountryCode":"fi"},{"countryCode":"fr","countryName":"France","managerCountryCode":"fr"},{"countryCode":"de","countryName":"Germany","managerCountryCode":"de"},{"countryCode":"gr","countryName":"Greece","managerCountryCode":"gr"},{"countryCode":"gt","countryName":"Guatemala","managerCountryCode":"gt"},{"countryCode":"hn","countryName":"Honduras","managerCountryCode":"hn"},{"countryCode":"hu","countryName":"Hungary","managerCountryCode":"hu"},{"countryCode":"in","countryName":"India","managerCountryCode":"in"},{"countryCode":"id","countryName":"Indonesia","managerCountryCode":"id"},{"countryCode":"ie","countryName":"Ireland","managerCountryCode":"gb"},{"countryCode":"il","countryName":"Israel","managerCountryCode":"il"},{"countryCode":"it","countryName":"Italy","managerCountryCode":"it"},{"countryCode":"jp","countryName":"Japan","managerCountryCode":"jp"},{"countryCode":"kz","countryName":"Kazakhstan","managerCountryCode":"kz"},{"countryCode":"ke","countryName":"Kenya","managerCountryCode":"in"},{"countryCode":"kw","countryName":"Kuwait","managerCountryCode":"kw"},{"countryCode":"la","countryName":"Laos","managerCountryCode":"th"},{"countryCode":"lv","countryName":"Latvia","managerCountryCode":"lt"},{"countryCode":"lb","countryName":"Lebanon","managerCountryCode":"lb"},{"countryCode":"lt","countryName":"Lithuania","managerCountryCode":"lt"},{"countryCode":"lu","countryName":"Luxembourg","managerCountryCode":"fr"},{"countryCode":"my","countryName":"Malaysia","managerCountryCode":"my"},{"countryCode":"mx","countryName":"Mexico","managerCountryCode":"mx"},{"countryCode":"md","countryName":"Moldavia","managerCountryCode":"ro"},{"countryCode":"ma","countryName":"Morocco","managerCountryCode":"ma"},{"countryCode":"mm","countryName":"Myanmar","managerCountryCode":"th"},{"countryCode":"nl","countryName":"Netherlands","managerCountryCode":"nl"},{"countryCode":"nz","countryName":"New Zealand","managerCountryCode":"nz"},{"countryCode":"ni","countryName":"Nicaragua","managerCountryCode":"ni"},{"countryCode":"no","countryName":"Norway","managerCountryCode":"no"},{"countryCode":"om","countryName":"Oman","managerCountryCode":"ae"},{"countryCode":"pk","countryName":"Pakistan","managerCountryCode":"pk"},{"countryCode":"pe","countryName":"Peru","managerCountryCode":"pe"},{"countryCode":"ph","countryName":"Philippines","managerCountryCode":"ph"},{"countryCode":"pl","countryName":"Poland","managerCountryCode":"pl"},{"countryCode":"pt","countryName":"Portugal","managerCountryCode":"pt"},{"countryCode":"qa","countryName":"Qatar","managerCountryCode":"ae"},{"countryCode":"ro","countryName":"Romania","managerCountryCode":"ro"},{"countryCode":"ru","countryName":"Russia","managerCountryCode":"ru"},{"countryCode":"sa","countryName":"Saudi Arabia","managerCountryCode":"sa"},{"countryCode":"rs","countryName":"Serbia","managerCountryCode":"rs"},{"countryCode":"sk","countryName":"Slovakia","managerCountryCode":"sk"},{"countryCode":"si","countryName":"Slovenia","managerCountryCode":"si"},{"countryCode":"za","countryName":"South Africa","managerCountryCode":"za"},{"countryCode":"kr","countryName":"South Korea","managerCountryCode":"kr"},{"countryCode":"es","countryName":"Spain","managerCountryCode":"es"},{"countryCode":"lk","countryName":"Sri Lanka","managerCountryCode":"in"},{"countryCode":"se","countryName":"Sweden","managerCountryCode":"se"},{"countryCode":"ch","countryName":"Switzerland","managerCountryCode":"ch"},{"countryCode":"th","countryName":"Thailand","managerCountryCode":"th"},{"countryCode":"tn","countryName":"Tunisia","managerCountryCode":"tn"},{"countryCode":"tr","countryName":"Türkiye","managerCountryCode":"tr"},{"countryCode":"ua","countryName":"Ukraine","managerCountryCode":"ua"},{"countryCode":"ae","countryName":"United Arab Emirates","managerCountryCode":"ae"},{"countryCode":"gb","countryName":"United Kingdom","managerCountryCode":"gb"},{"countryCode":"vn","countryName":"Vietnam","managerCountryCode":"vn"},{"countryCode":"us","countryName":"USA","managerCountryCode":"us"},{"countryCode":"ba","countryName":"Bosnia-Herzegovina","managerCountryCode":"ba"},{"countryCode":"bew","countryName":"Belgium (Wallonia)","managerCountryCode":"fr"},{"countryCode":"dz","countryName":"Algeria","managerCountryCode":"dz"}]
[{"address":"
Robatech AG
","city":"5630 Muri AG","code":"ch","countryName":"Switzerland","countryResponsibleFor":null,"email":"info@robatech.ch","phone":"+41 56 675 77 00","qrCode":null,"street":"
Pilatusring 10
","web":"https://www.robatech.com/en/contact-robatech"},{"address":"
Unique PI Sarl","city":"
Promotion SOMACOB BT. A1. N°18, 06000 Bejaia, Algérie","code":"dz","countryName":"Algeria","countryResponsibleFor":null,"email":"mohand.bouaichi@upi-gr.com","phone":"+213 34 12 06 70*","qrCode":null,"street":"
Mohand Bouaichi
\n
Zone industrielle Boulevard TIKAMIRA
","web":"https://upi-gr.com/"},{"address":"
UHLIG Representaciones S.R.L.
","city":"
Caseros, Prov. de Buenos Aires 1678
","code":"ar","countryName":"Argentina","countryResponsibleFor":null,"email":"info@uhligsrl.com.ar","phone":" +54 11 4734 1593","qrCode":null,"street":"
General Hornos 1307
","web":"https://www.uhligsrl.com.ar"},{"address":"
Robatech Australia Pty. Ltd.
","city":"
Silverwater NSW 2128
Australia
","code":"au","countryName":"Australia","countryResponsibleFor":null,"email":"infodesk@robatech.com.au","phone":" +61 2 9748 4559","qrCode":null,"street":"Unit 9/8 Millennium Court","web":"https://www.robatech.com/en-au/australia"},{"address":"
Robatech Austria GmbH","city":"
A-3494 Theiß
","code":"at","countryName":"Austria","countryResponsibleFor":null,"email":"office@robatech.at","phone":" +43 2735 36901 0","qrCode":null,"street":"
Im Wirtschaftspark 7
","web":"https://www.robatech.com/de-at/organisation-oesterreich"},{"address":"Robatech BEL","city":"
225304 Kobrin
","code":"by","countryName":"Belarus","countryResponsibleFor":null,"email":"robatech.BY@tut.by","phone":" +375 1642 26960","qrCode":null,"street":"
Sportivnayastr. 4 BY
","web":"https://www.robatech.com/be/belarus"},{"address":"
Ferrecker Ltda / Robatech do Brasil","city":"
BR - Curitiba - Parana
","code":"br","countryName":"Brazil","countryResponsibleFor":null,"email":"robatech@robatech.com.br","phone":" +55 41 3123 7200","qrCode":null,"street":"
Rua Frederico Carlos Toaldo 11
\n
CEP 82.320-360 Santa Felicidade
","web":"https://www.robatech.com/pt/brasil"},{"address":"
Robatech Canada","city":"
Bolton ON L7E 4J4
Canada
","code":"ca","countryName":"Canada","countryResponsibleFor":null,"email":"info@robatech.ca","phone":"+1 416 622 4784","qrCode":null,"street":"
110 Parr Blvd Unit 101
","web":"https://www.robatech.com/en-ca/organization-canada"},{"address":"
Equifar S.A.","city":"
CL - Santiago
","code":"cl","countryName":"Chile","countryResponsibleFor":null,"email":"info@robatech.cl","phone":" +56 23 2742 230","qrCode":null,"street":"
Vergara 684
","web":"https://www.robatech.com/es/robatech-chile/organizacion-chile"},{"address":"
Robatech (China) Limited
","city":"
CN - 511400 Guangzhou
P.R. China
","code":"cn","countryName":"China","countryResponsibleFor":null,"email":"info@robatech.cn","phone":" +86 20 3921 1716","qrCode":{"url":"https://f.hubspotusercontent20.net/hubfs/8586020/03-Country-Pages/China/WeChat.jpg","altText":"","height":737,"type":"image","width":734},"street":"
1-204 Industrial Building
Tian An Hi-Tech Ecological Park
No. 555 Panyu Avenue, Panyu District
","web":"https://www.robatech.com/en/robatech-china"},{"address":"
Codipack R.I., S.A.","city":"
Desamparados, Patarra
CR - Desamparados, San Jose
","code":"cr","countryName":"Costa Rica","countryResponsibleFor":null,"email":"codipackcr@relinsa.net","phone":" +506 2274-1833","qrCode":null,"street":"
OFIBODEGAS, Bodega #13
1 km Este del Liceo de San Antonio de
","web":"https://www.relinsa.com"},{"address":"
KALETECH s.r.o.","city":"
CZ-33011 Hromnice
","code":"cz","countryName":"Czech Republic","countryResponsibleFor":null,"email":"info@kaletech.cz","phone":" +420 378 605 805","qrCode":null,"street":"
Planá 20
","web":"https://www.kaletech.cz"},{"address":"
Robatech Nordic DK ApS","city":"
DK - 8870 Langå
","code":"dk","countryName":"Denmark","countryResponsibleFor":null,"email":"info@robatech.dk","phone":" +45 86 46 14 00","qrCode":null,"street":"
Industridalen 2
","web":"https://www.robatech.com/da-dk/"},{"address":"
J. C. Scientific Commercial Co.","city":"
EG - 11361 Sheraton Cairo
","code":"eg","countryName":"Egypt","countryResponsibleFor":null,"email":"info@jcsc-eg.com","phone":" +202 2267 44 94","qrCode":null,"street":"
116 Massaken Sakr Koreish
","web":"https://www.jcsc-eg.com/"},{"address":"
Servicios Industriales Internacionales, S.A. de C.V.","city":"
SV - San Salvador
","code":"sv","countryName":"El Salvador","countryResponsibleFor":null,"email":"serins@relinsa.net","phone":" +503 2235-2466","qrCode":null,"street":"
Colonia Buenos Aires #4Avenida Alvarado, Casa #28","web":"https://www.relinsa.com"},{"address":"
YTM-Industrial OY
","city":"
FIN - 01720 Vantaa
","code":"fi","countryName":"Finland","countryResponsibleFor":null,"email":"juha.lipponen@ytm.fi","phone":" +358 290 06 230","qrCode":null,"street":"
Tiilenlyöjänkuja 9 B","web":"https://www.ytm.fi"},{"address":"
Robatech","city":"
F - 55300 Chauvoncourt
","code":"fr","countryName":"France","countryResponsibleFor":null,"email":"info@robatech.fr","phone":"+33 3 2989 3614","qrCode":null,"street":"
Route de bar le duc
","web":"https://www.robatech.com/fr-fr/france/organisation-france"},{"address":"
Robatech GmbH","city":"
DE - 65520 Bad Camberg
","code":"de","countryName":"Germany","countryResponsibleFor":null,"email":"info@robatech.de","phone":" +49 6434 94110","qrCode":null,"street":"
Im Gründchen 2
","web":"https://www.robatech.com/de-de/organisation-deutschland"},{"address":"
NCA HELLAS Ltd.","city":"
GR - 14451 Metamorphosis
","code":"gr","countryName":"Greece","countryResponsibleFor":null,"email":"info@ncahellas.gr","phone":" +30 210 2815 300","qrCode":null,"street":"
5, Polemi Str.
","web":"https://www.ncahellas.gr/"},{"address":"
Relaciones Industriales, S.A.","city":"
GT - Guatemala City
","code":"gt","countryName":"Guatemala","countryResponsibleFor":null,"email":"relinsa@relinsa.net","phone":" +502 2505-5300","qrCode":null,"street":"
1a. Avenida 1-07 Zona 2 El Sauce
","web":"https://www.relinsa.com"},{"address":"
Facos S. DE R.L.","city":"
HN - San Pedro Sula
","code":"hn","countryName":"Honduras","countryResponsibleFor":null,"email":"serinh@relinsa.net","phone":" +504 2552-6353","qrCode":null,"street":"
Barrio Guamilito 7 Calle 7-8 Ave N.O. #62
","web":"https://www.relinsa.com"},{"address":"
Robatech Hungary
","city":"
HU - 8900 Zalaegerszeg
","code":"hu","countryName":"Hungary","countryResponsibleFor":null,"email":"zoltan.herenyi@robatech.hu","phone":" +36 30 151 151 8","qrCode":null,"street":"
Öveges József utca 3/a
","web":"https://www.robatech.com/en/robatech-hungary/organization-hungary"},{"address":"
Robatech India Pvt Ltd.
","city":"
IN - Dist Thane 421 311 Maharashtra
","code":"in","countryName":"India","countryResponsibleFor":null,"email":"info@robatech.in","phone":" +91 750 666 1880","qrCode":null,"street":"
213, E-3 Bhumi World, Mumbai Nasik Rd
Pimplas (Bhiwandi)
","web":"https://www.robatech.com/en-in/india"},{"address":"
Robatech Indonesia
","city":"
Ketapang Cipondoh
ID - 15146 Kota Tangerang Banten
","code":"id","countryName":"Indonesia","countryResponsibleFor":null,"email":"martinus.rafael@robatech.co.id","phone":" +62 812 8449 9227","qrCode":null,"street":"Ruko Green Lake CBD, Green lake city, Blok G2","web":"https://www.robatech.com/en-id/indonesia"},{"address":"
Itas","city":"
IL - 48091 Rosh-Ha‘ain
","code":"il","countryName":"Israel","countryResponsibleFor":null,"email":"info@itas.co.il","phone":" +97 239 026 616","qrCode":null,"street":"
Industrial Technology & Services Ltd.
8-10 Hamelacha St, Ind. Park
","web":"https://www.itas.co.il"},{"address":"
Robatech Italia s.r.l. u.s.
","city":"
IT - 47522 Cesena (FC)
","code":"it","countryName":"Italy","countryResponsibleFor":null,"email":"info@robatech.it","phone":" +39 0547 631700","qrCode":null,"street":"
Via Enrico Mattei, 71","web":"https://www.robatech.com/it-it/organizzazione-italia"},{"address":"
Robatech Japan K.K","city":"
JP - 5310061 Kita-ku, Osaka
","code":"jp","countryName":"Japan","countryResponsibleFor":null,"email":"info@robatech.jp","phone":"06 4801 4481","qrCode":null,"street":"
Katayama building
9-20, 2-chome Nagaranishi
","web":"https://www.robatech.com/ja-jp/japan"},{"address":"
UNCO JET Ltd
","city":"
KZ - Almaty 050000
","code":"kz","countryName":"Kazakhstan","countryResponsibleFor":null,"email":"info.uncojet@uncojet.com","phone":" +7 727 381-98-24","qrCode":null,"street":"
Auezov District, Almas Microdistrict, Building 246","web":"https://www.uncojet.kz"},{"address":"
AL-Jawad Photo & Trading Co.","city":"
KW - 13046 Safat
","code":"kw","countryName":"Kuwait","countryResponsibleFor":null,"email":"info@aljawadkw.com","phone":" +965 2 483 9101","qrCode":null,"street":"
P.O. Box 4545
Sahafa Street
","web":"https://www.alsanad.org/"},{"address":"
Zakka Multitec S.A.R.L.","city":"
Maten 1202 2110
","code":"lb","countryName":"Lebanon","countryResponsibleFor":null,"email":"info@zakkamultitec.com","phone":" +961 1 890 654","qrCode":null,"street":"
Zakka Bldg, Fanar, Beirut, Lebanon
PO Box: 90 1352,
","web":"https://www.zakkamultitec.com/"},{"address":"
Robatech (M) SDN BHD","city":"
MY - Selangor
","code":"my","countryName":"Malaysia","countryResponsibleFor":null,"email":"info@robatech.com.my","phone":" +603 7843 6636","qrCode":null,"street":"
No20, Jln PJU1A/13, Tmn Perindustrian Jaya, Ara Damansara,
Petaling Jaya 47301
","web":"https://www.robatech.com/en-my/organization-malaysia"},{"address":"
Unicode","city":"
MA - 20000 Casablanca
","code":"ma","countryName":"Morocco","countryResponsibleFor":null,"email":"unicode@unicode.ma","phone":" +212 522 672 522","qrCode":null,"street":"
57, Allée des Jardins
","web":"https://www.unicodemaroc.com"},{"address":"
Robatech de Mexico S.A. de C.V.","city":"
MX – Querétaro, Qro C.P. 76116
","code":"mx","countryName":"Mexico","countryResponsibleFor":null,"email":"robatech@robatech.com.mx","phone":"+52 442 348 1354","qrCode":null,"street":"
Av Peñaflor # 1102
Col. Ciudad del Sol
Novatec Business park Int 97-A
","web":"https://www.robatech.com/es-mx/organizacion-mexico"},{"address":"
IMH EngineeringIntelligent Material Handling","city":"
NZ - 4110 Napier
","code":"nz","countryName":"New Zealand","countryResponsibleFor":null,"email":"info@imhengineering.co.nz","phone":" +64 22 164 2126","qrCode":null,"street":"
4F/3 Shakespeare Rd
","web":"https://www.imhengineering.co.nz"},{"address":"
Codipack R.I., S.A.","city":"
NI - Managua
","code":"ni","countryName":"Nicaragua","countryResponsibleFor":null,"email":"relinsa@relinsa.net","phone":" +505 2299 3584","qrCode":null,"street":"
Villa Pedro Joaquín Chamorro, semáforos de la Róbelo
5 cuadras al norte ½ cuadra al oeste
","web":"https://www.relinsa.com"},{"address":"
Robatech Nordic NO AS","city":"
NO - 3511 Hønefoss
","code":"no","countryName":"Norway","countryResponsibleFor":null,"email":"info@robatech.no","phone":" +47 32 14 23 75","qrCode":null,"street":"
Hvervenmoveien 45
","web":"https://www.robatech.com/no/norge"},{"address":"
Ultratec International","city":"
PK - Lahore Cantt
","code":"pk","countryName":"Pakistan","countryResponsibleFor":null,"email":"info@ultratecpak.com","phone":" +92 321 844 83 84","qrCode":null,"street":"
4-A Abdul Rehman Road,
Imtiaz Shaheed Road
","web":"https://www.ultratecpak.com"},{"address":"
AUMPACK INC
","city":"
PH - 1780 Muntinlupa City
","code":"ph","countryName":"Philippines","countryResponsibleFor":null,"email":"info@aumpack.com","phone":"+63-2-8041588","qrCode":null,"street":"
Unit 810, Alpap II bldg., Trade Ave.
Cor. Investment Drive, Madrigal Business Park
","web":"http://www.aumpack.com"},{"address":"Robatech Poland Sp. z o.o.","city":"
PL - 42-229 Częstochowa
","code":"pl","countryName":"Poland","countryResponsibleFor":null,"email":"contact@robatech.pl ","phone":"+48 453 400 090","qrCode":null,"street":"
ul.Jagiellońska 81/83
","web":"https://www.robatech.com/pl-pl/poland"},{"address":"
Robatech Rus LLC","city":"
RU - 197374, Saint-Petersburg
","code":"ru","countryName":"Russia","countryResponsibleFor":null,"email":"gt@robatech.ru","phone":" +7 812 449 56 78","qrCode":null,"street":"
Business Center „Lakhta“, office 215
Optikov St., house 4, bldg. 2, A
","web":"https://www.robatech.ru"},{"address":"
Yousef Al Sanad Trading Est.","city":"
KSA - Jeddah 21484
","code":"sa","countryName":"Saudi Arabia","countryResponsibleFor":null,"email":"info@alsanad.org","phone":" +966 555 840 301","qrCode":null,"street":"
P.O. Box 17305
Tahlia Street
","web":"https://www.alsanad.org"},{"address":"
MB Print d.o.o.","city":"
RS - 21235 Temerin
","code":"rs","countryName":"Serbia","countryResponsibleFor":null,"email":"office@mbprint.eu","phone":"+381 21 844 400","qrCode":null,"street":"
Novosadska 280
","web":"https://www.mbprint.eu/"},{"address":"
Robatech SA (Pty) Ltd (Western Cape)","city":"
ZA - Cape Town 7405
","code":"za","countryName":"South Africa","countryResponsibleFor":null,"email":"info@robatech.co.za","phone":"+27 21-510 6903","qrCode":null,"street":"
24 Shropshire Street
Paarden Eiland
","web":"https://www.robatech.com/en-za/south-africa/organization"},{"address":"SETEC Korea","city":"
KR - 133-120 Seoul
","code":"kr","countryName":"South Korea","countryResponsibleFor":null,"email":"robatech@robatech.co.kr","phone":"+82 2 971 0471","qrCode":null,"street":"
Room No. 203, IS Biz Tower, 147 SeongSu-2Ro
SeongDong-Gu
","web":null},{"address":"
Robatech Nordic AB","city":"
SE - 302 62 Halmstad
","code":"se","countryName":"Sweden","countryResponsibleFor":null,"email":"info@robatech.se","phone":"+46 35 299 0510","qrCode":null,"street":"
Ryttarevägen 18B
","web":"https://www.robatech.com/sv/sverige"},{"address":"
JETS","city":"
TN - Tunis 1082
","code":"tn","countryName":"Tunisia","countryResponsibleFor":null,"email":"jets@gnet.tn","phone":" +216 71 235 518","qrCode":null,"street":"
Tour des bureaux ICC Agence 04 RDC
Centre Urbain Nord
","web":"https://jets-tn.com/"},{"address":"
Robatech Tutkal Teknolojileri Sanayi ve Ticaret A. Ş.","city":"
TR - 41040 İzmit - Kocaeli
","code":"tr","countryName":"Türkiye","countryResponsibleFor":null,"email":"info@robatech.com.tr","phone":"+90 262 322 41 57","qrCode":null,"street":"
Sanayi Mah. Kozalı Sok. No: 10 Çarşı Yapı
Sitesi C33
","web":"https://www.robatech.com/tr-tr/organizasyon-turkiye"},{"address":"
RO Technologies","city":"
UA - Kiev 04111
","code":"ua","countryName":"Ukraine","countryResponsibleFor":null,"email":"info@robatech.com.ua","phone":"+380 68 224 66 42","qrCode":null,"street":"
Danila Schbakivskogo st. 52, 429,
","web":"https://www.robatech.com/uk/ukraine"},{"address":"
Robatech Gluing Technology","city":"
Essex SS15 6SW
United Kingdom
*Robatech Gluing Technology is an
authorized trading name of W. H. Leary Ltd.
","code":"gb","countryName":"United Kingdom","countryResponsibleFor":null,"email":"info@robatechGT.com","phone":"+44 1268 490035","qrCode":null,"street":"
2 Seax Way, Basildon
","web":"www.robatech.com/en-gb/great-britain"},{"address":"
Robatech USA Inc.","city":"
Alpharetta, GA 30005 USA
","code":"us","countryName":"USA","countryResponsibleFor":null,"email":"info@robatechusa.com","phone":"+1 770 663 8380","qrCode":null,"street":"
1005 Alderman Drive Ste 207
","web":"https://www.robatech.com/en-us/organization-usa"},{"address":"
Vinatech Co., Ltd.","city":"
Ho Chi Minh City, VN - 727010 HCM
","code":"vn","countryName":"Vietnam","countryResponsibleFor":null,"email":"info@vinatech.biz","phone":"+84 28 3601 8068","qrCode":null,"street":"
38 Street 2 - Cityland, An Nhon ward
","web":"https://www.vinatech.biz"},{"address":"
Robatech Gulf FZE
","city":"
UAE – Sharjah","code":"ae","countryName":"United Arab Emirates","countryResponsibleFor":null,"email":"info@robatech.ae","phone":"+971 562 55 4966","qrCode":null,"street":"
Sharjah Airport Free Zone
","web":"https://www.robatech.com/en/robatech-united-arab-emirates"},{"address":"
UAB Tecalemit
","city":"
LT - 02189, Vilnius
","code":"lt","countryName":"Lithuania","countryResponsibleFor":null,"email":"egidijus.s@tecalemit.lt","phone":" +370 5 210 6210","qrCode":null,"street":"
Dariaus ir Gireno g. 177
","web":"https://www.tecalemit.lt"},{"address":"
Robatech bv
","city":"
NL - 6931 KE Westervoort
","code":"nl","countryName":"Netherlands","countryResponsibleFor":null,"email":"info@robatech.nl","phone":"+31 26 319 01 10","qrCode":null,"street":"
Mollevite 5
","web":"https://www.robatech.com/nl/nederland"},{"address":"
NOBLEKA SAC
","city":"
PE - Lima 41
","code":"pe","countryName":"Peru","countryResponsibleFor":null,"email":"mario.calderon@nobleka-digital.com","phone":"+51-998-308-912","qrCode":null,"street":"
Calle Bronsino 320
San Borja
","web":"https://www.nobleka.com.pe"},{"address":"
Kovacs Trade Company S.R.L
","city":"
RO - Jud. Mures
","code":"ro","countryName":"Romania","countryResponsibleFor":null,"email":"j.kovacs@kovacstrade.ro","phone":"+40 744 624 947","qrCode":null,"street":"
Cart. Rodnei 3/3
545300 Reghin
","web":"https://www.kovacstrade.com"},{"address":"
Robatech España, S.L.
","city":"
ES - 28021 Villaverde - Madrid
","code":"es","countryName":"Spain","countryResponsibleFor":null,"email":"info@robatech.es","phone":"+34 91 683 82 14","qrCode":null,"street":"
C/ Ciudad de Frias, 11 y 13 Nave E
","web":"https://www.robatech.com/es-es/espana/organizacion-espana"},{"address":"
iNEX Technology Co., Ltd
","city":"
TH - Bangkok 10230
","code":"th","countryName":"Thailand","countryResponsibleFor":null,"email":"sales@inextechnology.com","phone":"+66 2 578 8311","qrCode":null,"street":"
442 Sukhonthasawat Road
Ladprao
","web":"https://inex.co.th/"},{"address":"Robatech Austria GmbH, o.z.","city":"
81106 Bratislava
","code":"sk","countryName":"Slovakia","countryResponsibleFor":null,"email":"jakub.buchel@robatech.sk","phone":"+421 918 514 401","qrCode":null,"street":"
Hodžovo námestie 1/A
","web":"https://www.robatech.com/sk/slovensko"},{"address":"
MB Print d.o.o. Bosna i Hercegovina","city":"
Grude, Gorica, 88345
","code":"ba","countryName":"Bosnia-Herzegovina","countryResponsibleFor":null,"email":"marko@mbprint.ba","phone":"+387 39 671 207","qrCode":null,"street":"
Brig 96
","web":"http://www.mbprint.ba"},{"address":"Robatech Austria GmbH - podružnica v Ljubljani","city":"1351 Brezovica pri Ljubljani","code":"si","countryName":"Slovenia","countryResponsibleFor":null,"email":"matej.zvajkar@robatech.si","phone":"+386 41 568 573","qrCode":null,"street":"
Matej Žvajkar, Prodaja in servis
Tržaška cesta 515
","web":"https://www.robatech.com/sl/slovenija"},{"address":"
Robatech Headquarters
","city":"5630 Muri AG","code":"hq","countryName":"Headquarters","countryResponsibleFor":null,"email":"info@robatech.ch","phone":"+41 56 675 77 00","qrCode":null,"street":"
Pilatusring 10
","web":"https://www.robatech.com/en/contact-robatech"},{"address":"Robatech Austria GmbH - podružnica v Ljubljani","city":"1351 Brezovica pri Ljubljani","code":"hr","countryName":"Croatia","countryResponsibleFor":null,"email":"matej.zvajkar@robatech.si","phone":"+386 41 568 573","qrCode":null,"street":"
Matej Žvajkar, Prodaja in servis
Tržaška cesta 515
","web":"https://www.robatech.com/sl/slovenija"},{"address":"
Robatech Portugal
","city":"4590-057 Paços de Ferreira","code":"pt","countryName":"Portugal","countryResponsibleFor":null,"email":"comercial@robatech.pt","phone":"+351 255 096 241","qrCode":null,"street":"
Rua Santa Luzia, nº 74
","web":null}]

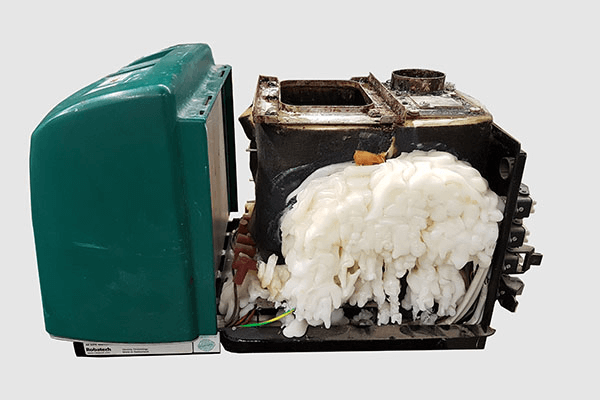 Lumps of adhesive on the outside of the adhesive tank cripple the entire system
 External cleaning is particularly important in a dusty environment
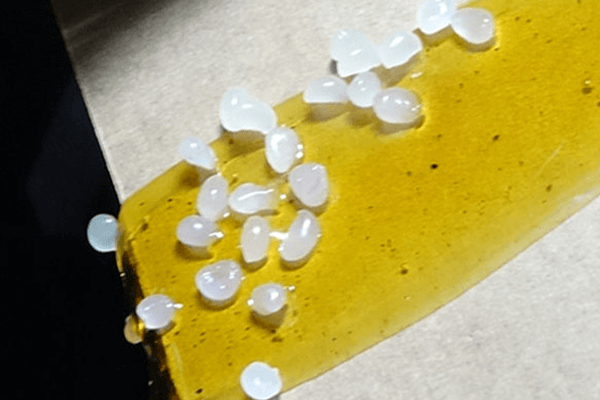 The darker the discoloration of the adhesive, the more necessary cleaning is
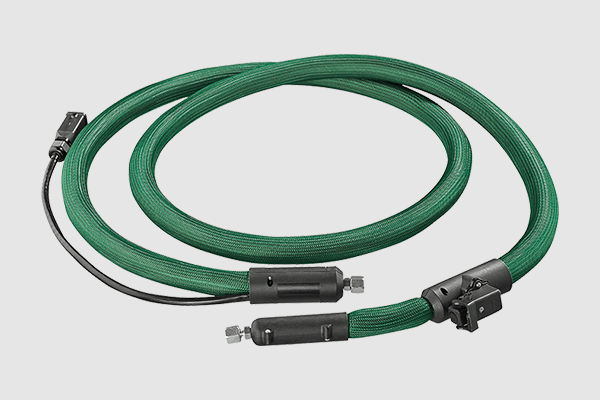
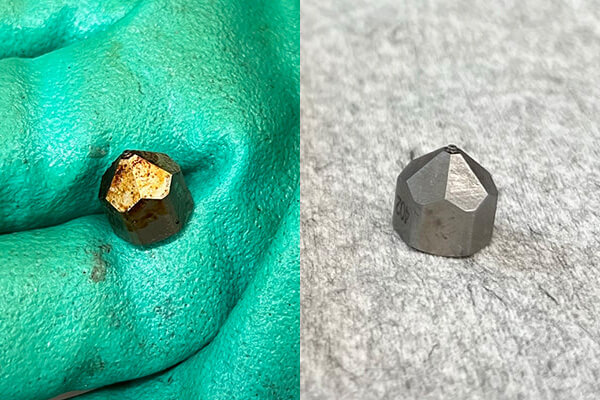 Cleaned application nozzles ensure perfect application
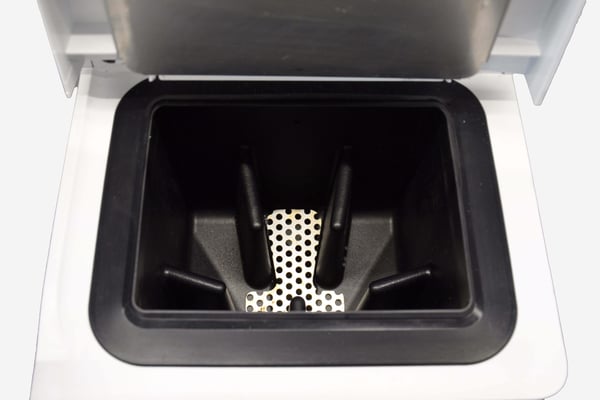
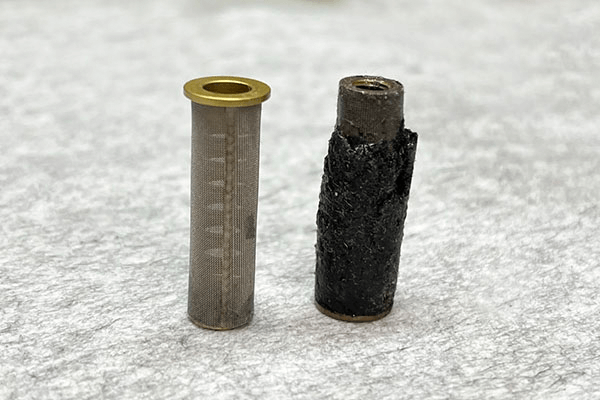 With such a heavily charred filter, cleaning is no longer worthwhile. It can be replaced.


COMMENTS
20 COMMENTS